

為了著重健康意識的一群 - 高科技消費者、運動狂熱份子、甚至只是一個普通的iPhone用戶,Apple透過 HealthKit 讓開發者來追踪重要的健康數據。這是很酷!用戶輕易地便可以追踪到一段時間內的健康數據記錄。除了有助提升健康知識之外,看到數據所顯示出來的正斜率,確實是一種鼓舞和強大的激勵因素。
大家或許想像到,管理健康資訊最重要的是安全性。HealthKit 的所有資訊控制權都是掌控在用戶手中。用戶可以按自己的意願去授予或拒絕 App 訪問健康數據的請求。
對於開發者,我們需要向用戶請求授權以讀寫 HealthKit 的數據。事實上,我們需要特別說明希望訪問或受影響的是什麼數據。另外,每個存取 HealthKit 的 App 都須具備私權政策,讓用戶可以感受更安心的資訊交易。
關於 OneHourWalker
今天,我們將會建立一個有趣的小程式,它既可以讀取 HealthKit 的資訊,也能寫入新數據。
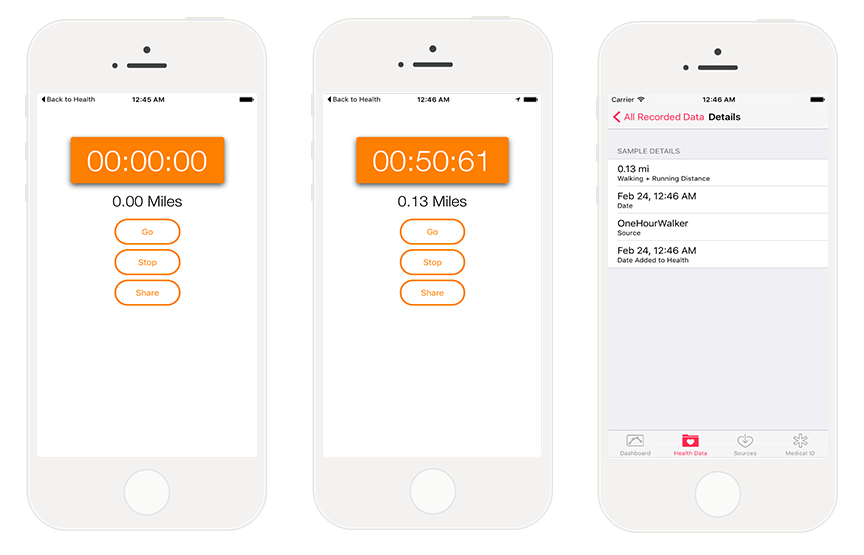
OneHourWalker 是一個健康程式,以一小時為限,追踪用戶行走或跑步的距離。然後,用戶可以把記錄下來的數據分享至 HealthKit,而它將可以訪問 Health 程式。我明白以一小時為限是有點樂觀,至少對我而言。沒關係,用戶可以提早結束記錄,也可以繼續分享距離。
這樣,聽起來它好像只是把數據抄寫到 HealthKit。那麼我們將會讀取的又會是什麼?
這是一個很好的問題!當我去散步,我喜歡走到樹林中的遠足小徑。我經常都會經過一些長得較低的樹木橫枝。然而我有六尺四寸高,這構成了實在的問題。我們的解決辦法:我們透過 HealthKit 得知用戶的高度,然後在程式中標示出來。這將會為用戶提供友善的提示,讓他漫步山林之中能多點留神,以免撞到樹枝而壞了雅興甚至受傷。
開始之前,先到這裡下載 OneHourWalker 範例檔。把它打開並執行,先感受一下程式是如何運作。計時器(timer)定位跟踪(location tracking)都準備就緒,因此我們便可以集中火力在 HealthKit 的實作。作為一個重點,以60分鐘為時限,計時器及追踪將會停止運作。
啟動 HealthKit
首先,第一步是在我們的程式中啟動 HealthKit。在本教學中,請點選 OneHourWalker 和 Targets 裡的 OneHourWalker。然後,選擇在螢幕的上方選擇 Capabilities 版面。
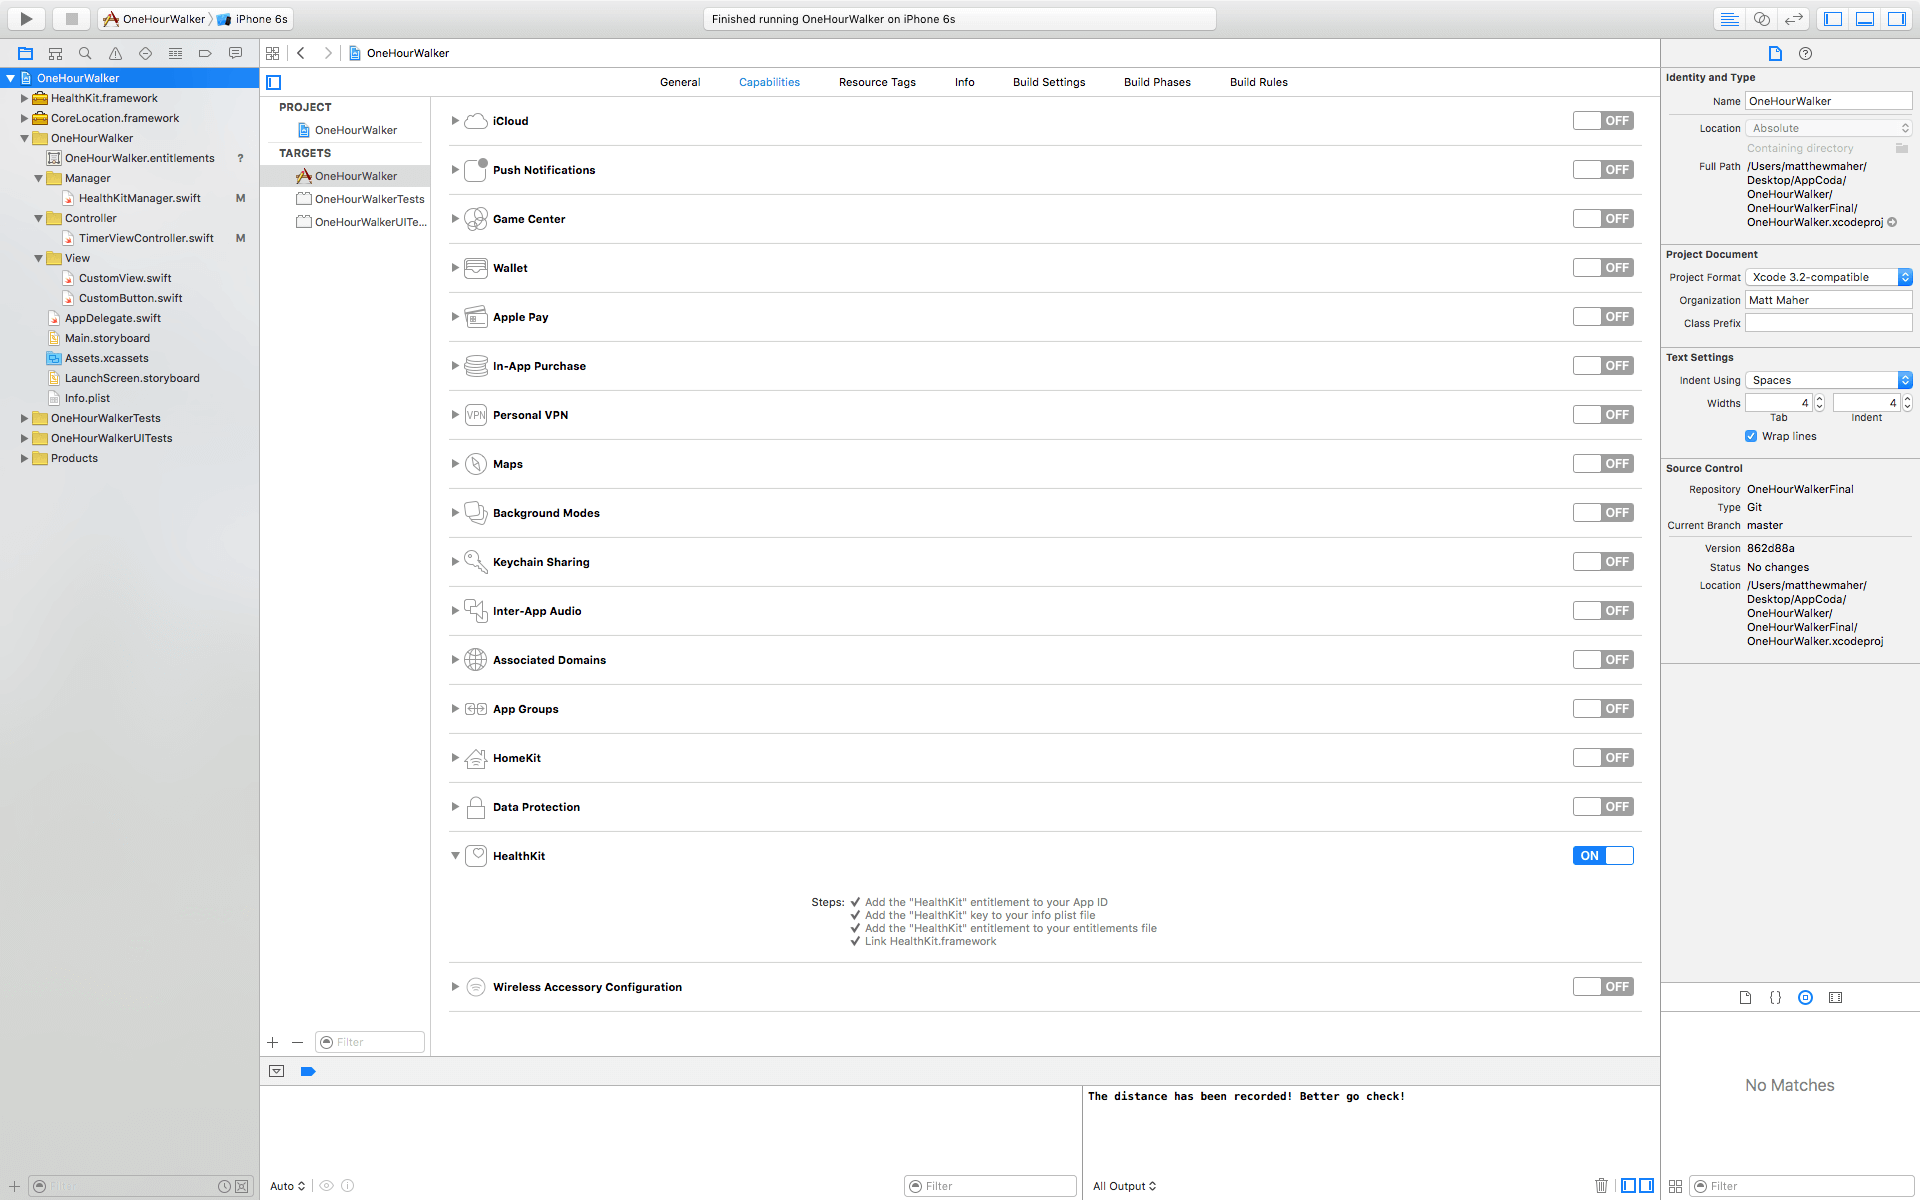
看一看Capabilities列表的下方,把 HealthKit 轉為啟動 (turn on)。這一個動作已經把 HealthKit 授權添加至 App ID,也為 plist 文檔添加 HealthKit 鑰匙資訊,權限文件加入 HealthKit 授權,並且連結至 HealthKit.framework。就是這麼簡單。
開始寫程式
打開 TimerViewController.swift,我們將會把 HealthKit 加入至 OneHourWalker。首先,我們要建立一個 HealthKitManager 實體。
import UIKit
import CoreLocation
import HealthKit

class TimerViewController: UIViewController, CLLocationManagerDelegate {

    @IBOutlet weak var timerLabel: UILabel!
    @IBOutlet weak var milesLabel: UILabel!
    @IBOutlet weak var heightLabel: UILabel!

    var zeroTime = NSTimeInterval()
    var timer : NSTimer = NSTimer()

    let locationManager = CLLocationManager()
    var startLocation: CLLocation!
    var lastLocation: CLLocation!
    var distanceTraveled = 0.0

    let healthManager:HealthKitManager = HealthKitManager()
HealthKitManager.swift 是 HealthKit 處理所有操作的地方,包括一些很關鍵的方法都會在這裡處理,我們將會稍後再說。
在本文開首時提及過,我們需要得到使用者授權去讀取他們的健康數據。就在 viewDidLoad(),先看看下面的程式碼。
    override func viewDidLoad() {
        super.viewDidLoad()

        locationManager.requestWhenInUseAuthorization()

        if CLLocationManager.locationServicesEnabled(){
            locationManager.delegate = self
            locationManager.desiredAccuracy = kCLLocationAccuracyBest
        } else {
            print("Need to Enable Location")
        }

        // We cannot access the user's HealthKit data without specific permission.
        getHealthKitPermission()
    }
getHealthKitPermission() 方法將會呼叫出 HealthKitManager 的 authorizeHealthKit() 方法。若一切順利,我們可以呼叫 setHeight() 方法,我們將會仔細說明更多。
    func getHealthKitPermission() {

        // Seek authorization in HealthKitManager.swift.
        healthManager.authorizeHealthKit { (authorized,  error) -> Void in
            if authorized {

                // Get and set the user's height.
                self.setHeight()
            } else {
                if error != nil {
                    print(error)
                }
                print("Permission denied.")
            }
        }
    }
在 HealthKitManager.swift,我們將會建立一個 authorizeHealthKit() 方法。在此之前,我們需要為 HealthKit 建立存儲的位置,把 app 與 HealthKit 的數據連接上。
Over in HealthKitManager.swift, we will build the authorizeHealthKit() method. Above that, however, we need to create our HealthKit store, which links the app to HealthKit’s data.
    let healthKitStore: HKHealthStore = HKHealthStore()

    func authorizeHealthKit(completion: ((success: Bool, error: NSError!) -> Void)!) {

        // State the health data type(s) we want to read from HealthKit.
        let healthDataToRead = Set(arrayLiteral: HKObjectType.quantityTypeForIdentifier(HKQuantityTypeIdentifierHeight)!)

        // State the health data type(s) we want to write from HealthKit.
        let healthDataToWrite = Set(arrayLiteral: HKObjectType.quantityTypeForIdentifier(HKQuantityTypeIdentifierDistanceWalkingRunning)!)

        // Just in case OneHourWalker makes its way to an iPad...
        if !HKHealthStore.isHealthDataAvailable() {
            print("Can't access HealthKit.")
        }

        // Request authorization to read and/or write the specific data.
        healthKitStore.requestAuthorizationToShareTypes(healthDataToWrite, readTypes: healthDataToRead) { (success, error) -> Void in
            if( completion != nil ) {
                completion(success:success, error:error)
            }
        }
    }
當向使用者提出讀取用戶的健康數據授權許可,我們需要列明那些資訊我們想要獲取和寫入。以本文為例,我們需要讀取用戶的高度,因而使他們可以及早注意到樹枝的危險。我們都希望HealthKit提供一個HKObject數量,使我們可以將它轉換成可理解的高度。同時我們會請求使用者的准許,以HKObject數量寫入用戶行走或跑步的距離。
由於iPad沒有預設HealthKit程式,故此要為 OneHourWalker 在 iPad 作出提示,之後就可以正式提出授權的請求。
當我們在 HealthKitManager.swift,先建立getHeight()方法去讀取HealthKit中使用者高度數據。
    func getHeight(sampleType: HKSampleType , completion: ((HKSample!, NSError!) -> Void)!) {

        // Predicate for the height query
        let distantPastHeight = NSDate.distantPast() as NSDate
        let currentDate = NSDate()
        let lastHeightPredicate = HKQuery.predicateForSamplesWithStartDate(distantPastHeight, endDate: currentDate, options: .None)

        // Get the single most recent height
        let sortDescriptor = NSSortDescriptor(key: HKSampleSortIdentifierStartDate, ascending: false)

        // Query HealthKit for the last Height entry.
        let heightQuery = HKSampleQuery(sampleType: sampleType, predicate: lastHeightPredicate, limit: 1, sortDescriptors: [sortDescriptor]) { (sampleQuery, results, error ) -> Void in

                if let queryError = error {
                    completion(nil, queryError)
                    return
                }

                // Set the first HKQuantitySample in results as the most recent height.
                let lastHeight = results!.first

                if completion != nil {
                    completion(lastHeight, nil)
                }
        }

        // Time to execute the query.
        self.healthKitStore.executeQuery(heightQuery)
    }
第一步,我們需要取得高度數據去建立一個述詞 (predicate) 為時間參數作出定義。我們需要知道在一段時間之內的高度數據 - 由過往一段時間至現今。而回應的將是一個陣列。實際上我們只要最近期的高度,所以對數據的訪問會以新增數據為排列優先。
在建立查詢時,我們會限制陣列值為1。為有可能出現的錯誤作出安排後,我們將會分配第一,也是唯一一個的物件成為lastHeight。然後,可以準備完成getHeight()方法。最後,從使用者健康數據中執行查詢。
回到 TimerViewController.swift,在app給予使用者之前,先假設得到使用者的允許,在getHealthKitPermission()呼叫setHeight()。
var height: HKQuantitySample?
接著,我們需要為HKQuantitySample實例宣告一個高度變數。
    func setHeight() {
        // Create the HKSample for Height.
        let heightSample = HKSampleType.quantityTypeForIdentifier(HKQuantityTypeIdentifierHeight)

        // Call HealthKitManager's getSample() method to get the user's height.
        self.healthManager.getHeight(heightSample!, completion: { (userHeight, error) -> Void in

            if( error != nil ) {
                print("Error: \(error.localizedDescription)")
                return
            }

            var heightString = ""

            self.height = userHeight as? HKQuantitySample

            // The height is formatted to the user's locale.
            if let meters = self.height?.quantity.doubleValueForUnit(HKUnit.meterUnit()) {
                let formatHeight = NSLengthFormatter()
                formatHeight.forPersonHeightUse = true
                heightString = formatHeight.stringFromMeters(meters)
            }

            // Set the label to reflect the user's height.
            dispatch_async(dispatch_get_main_queue(), { () -> Void in
                self.heightLabel.text = heightString
            })
        })

    }
在share()方法之前,先行建立 setHeight()方法。由HKQuantityTypeIdentifierHeight識別出高度數據例子成為 HKQuantity。
接著,我們會呼叫之前在HealthKitManager建立的getHeight()方法。伴隨著高度例子,我們需要把它轉換成合適的字串,然後顯示在label上。一如以往,我們需要為潛在的錯誤作出準備。
目前為止,使用者已經可以打開app,假設他們都已經把身高記錄在Health App大,便可以查看高度,啟動計時器,開始追踪他們步行或跑步的距離。下一步將會把得來的距離數據寫入Health App,讓使用者在一個地方整齊地儲存他們所有的健身數據。
當使用者完成郊遊,這將會是完整60分鐘或以下的時間,只要他們按下Share按鈕便可以把得來不易的數據存入Health App。所以,在 share()方法,我們會呼叫 HealthKitManager.swift的saveDistrance()方法去開始進行,我們將會把距離及日期傳送出去。這樣,使用者日後便可以參考以往成績作為突破目標。
@IBAction func share(sender: AnyObject) {
    healthManager.saveDistance(distanceTraveled, date: NSDate())
}
返回manager,準備建立saveDistance()。首先,我們需要讓HealthKit知道我們想寫入步行/跑步的距離數量。然後,我們要為量度單位設定為英里 (miles),並且建立一個HKQuantitySample物件。HealthKit 的 saveObject() 方法將會在使用者健康數據中寫入新數據。
    func saveDistance(distanceRecorded: Double, date: NSDate ) {

        // Set the quantity type to the running/walking distance.
        let distanceType = HKQuantityType.quantityTypeForIdentifier(HKQuantityTypeIdentifierDistanceWalkingRunning)

        // Set the unit of measurement to miles.
        let distanceQuantity = HKQuantity(unit: HKUnit.mileUnit(), doubleValue: distanceRecorded)

        // Set the official Quantity Sample.
        let distance = HKQuantitySample(type: distanceType!, quantity: distanceQuantity, startDate: date, endDate: date)

        // Save the distance quantity sample to the HealthKit Store.
        healthKitStore.saveObject(distance, withCompletion: { (success, error) -> Void in
            if( error != nil ) {
                print(error)
            } else {
                print("The distance has been recorded! Better go check!")
            }
        })
    }
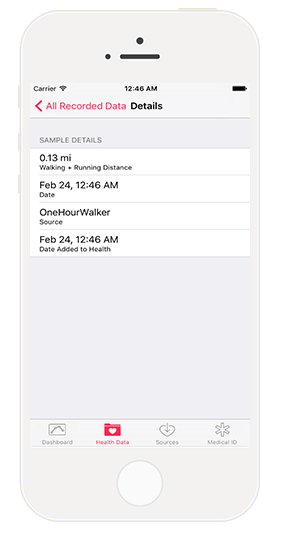
再次回到 Health App,一旦啟動了程式,走路及跑步的距離數據都會被記錄下來。同樣,跟隨著這個路徑:Health Data tab > Fitness > Walking + Running Distance > Show All Data 就可以看到指定例子。我們記錄下來的數據都能在這個列表看到。再次點擊儲存格,就能顯示出完整的詳細資料。
透過OneHourWalker,我們有助世界各地iOS使用者邁向體格健康之路。但,這只是開始。在讀寫HealthKit健康數據之中仍然有很多開發的空間。
無可否認,對使用者而言能夠查閱數據是十分棒的。人們很方便的能夠每天、每星期去作出比較,令他們一步一步達成目標。而通過開發者不同的能力,提供新穎、有創意和有趣的方法去擷取數據,也是十分重要。
當然,測試 HealthKit apps 是充滿趣味。
你可以在GitHub下載完整版本的 OneHourWalker。
原文:Building a Fitness App Using HealthKit to Track Walking Distance