

在眾多 BaaSs 之中,表現最佳和最受歡迎的是 Google Firebase。事實上,Firebase 有著優良的效能、實施性和維護性。Firebase 最為人所知的一個重要特點,就是它是完全以 JSON 為存儲格式的實時數據庫。在數據庫中的任何改變都會立即同步到所有連接該數據庫的客戶端和設備。換句話說,Firebase 有超乎想像的快速,幾乎任何數據都是實時刷新的。
Firebase 支援用戶驗證以及存儲,所有數據通過安全的 SSL 進行傳輸。用戶驗證可以透過郵箱和密碼,或者 Facebook、Twitter、Github、Google 或自定認證等方式。
除了 iOS,Firebase SDK 還支援 Android 和 JavaScript。所有平台都可以共用同一個數據庫, Firebase 還會自動調整 App 的大小。
但擁有所有這些特性的 Firebase 的物超所值。會不會有什麼隱藏的陷阱在其中呢?
確實沒有任何陷阱。直至寫作本教程為止,免費版的 Firebase 支援同一時間少於 100 個的連接。對於絕大部分的主流 App 來說,100個開放網絡連接已是十分足夠。當用戶量有所增長,可以支付$49美金的月費,便沒有連接數量限制。
關於 FirebaseJokes
今天,我們會用 Firebase 建立一個笑話 (Jokes) App。在這個 App 中,我們允許用戶以郵箱和密碼建立賬號並進行登錄。當用戶發佈一個笑話,表格視圖 (table view) 會作出實時刷新。如此之類,每當有用戶發佈新的笑話,這個表格便會立即刷新。更有趣的是,我們還添加了一個點讚功能,那些超級搞笑的笑話會獲得其他用戶給予的好評。
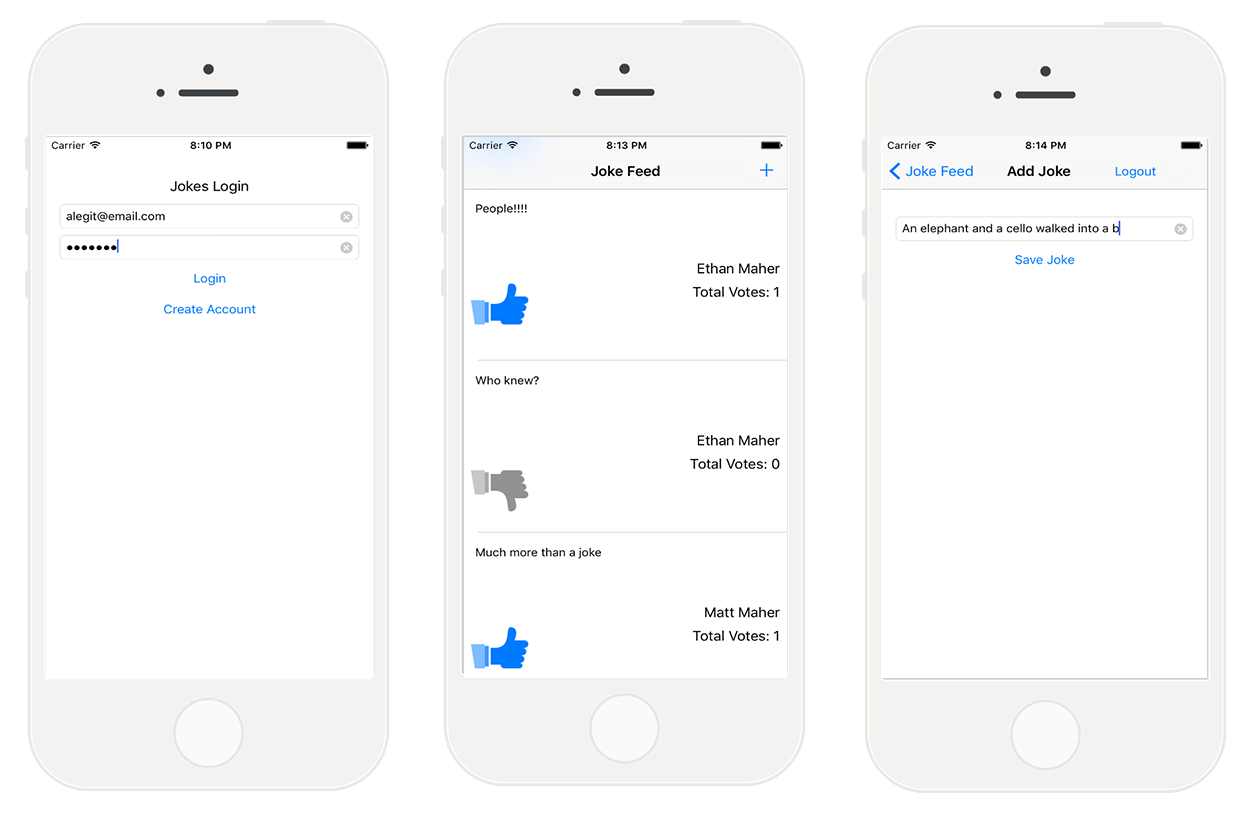
這是我們準備在 FirebaseJokes 中實現的功能:
- 建立賬號
- 用郵箱和密碼進行登錄
- 登出
- 對於已登錄用戶,則跳過登錄
- 發表笑話
- 使用 UITableView 記載笑話的發佈者和好評
- 點讚功能
請先下載範案專案。
首先,打開 Main.Storyboard,透過 Storyboard 的視覺編輯器對這個 App 的運作得到初步概念。
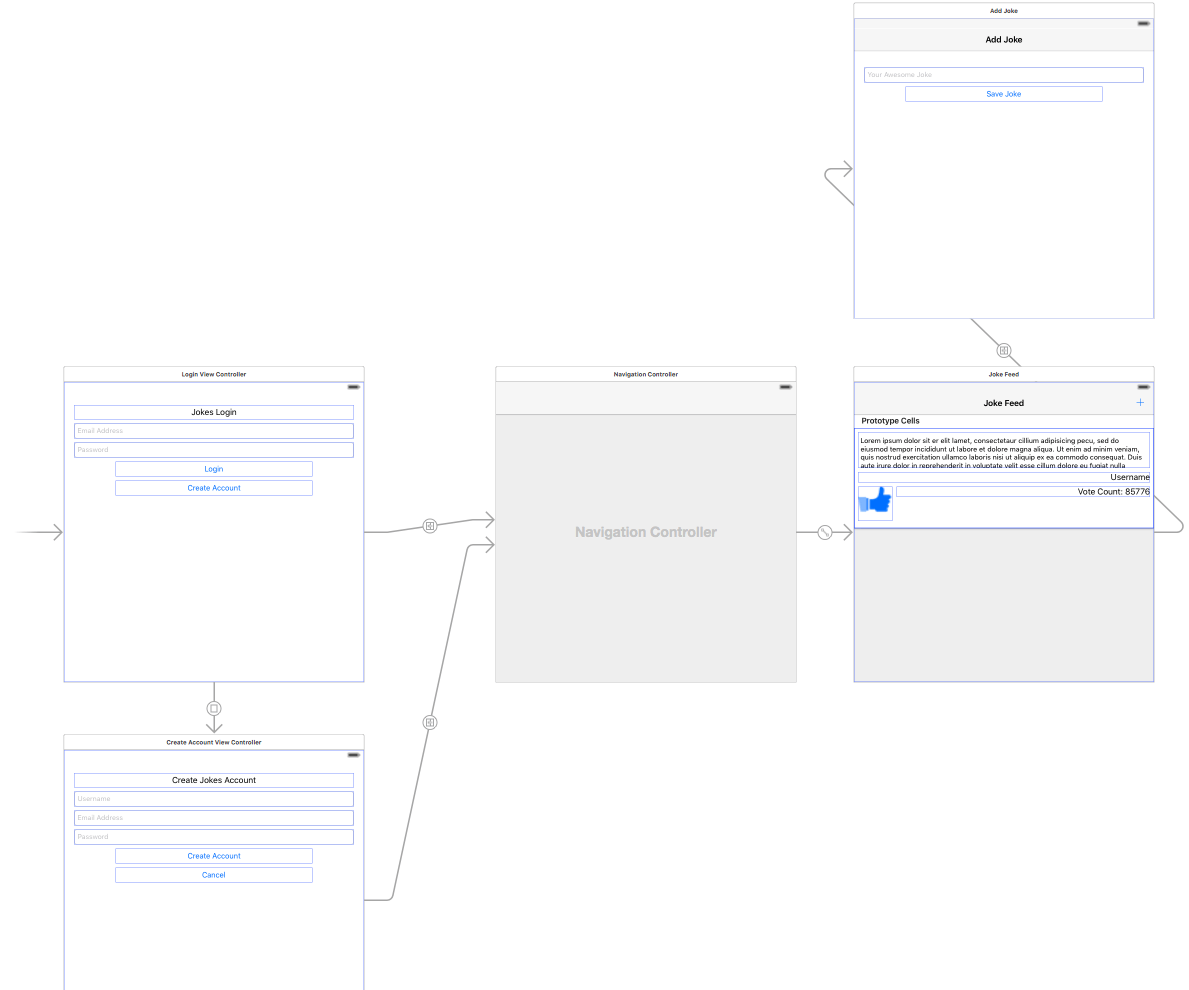
在實現整個 App 的過程中,我們會按照順序、有邏輯地、一步一步地讓你理解 Firebase 的使用方法。這是一個很好的框架,易於使用,非常有意思。事不宜遲,馬上開始製作 FirebaseJokes。
下載 Firebase
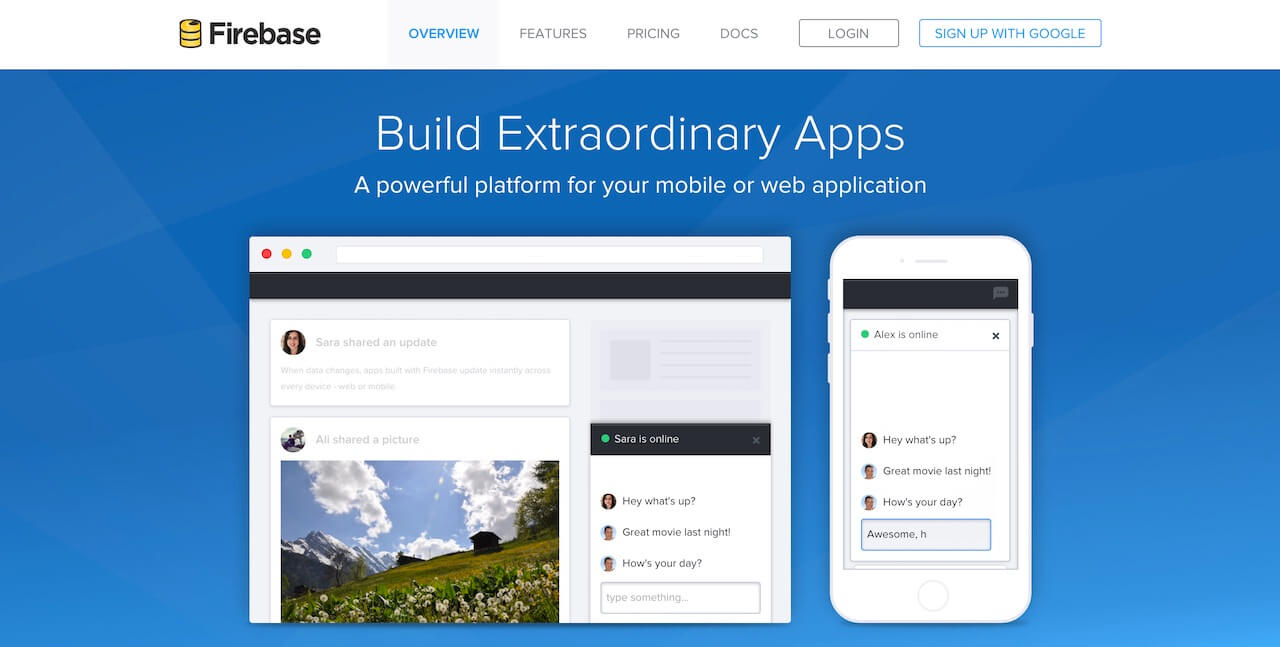
進入 Firebase 官網 ,註冊一個 Firebase 賬號,如果你已經註冊過的話則登錄你的 Firebase 賬號。也可以用 SIGN UP WITH GOOGLE 進行快速登錄。辦理好註冊賬號後,我們會直接跳過5分鐘的使用教程,因為那是針對 Javascript 的,我們需要下載的是 iOS SDK。
在 My First App 下點擊 Manage App,略略了解一下 Firebase 包含了些什麼。Firebase Forge 是一個超酷的圖形化偵錯器,這個教程是非常值得看一下的。Forge 教程會告訴你如何建立 keys、value 以及透過使用 + 號增加子代。這看起來就是 JSON 嘛,對不對?要退出 Forge 教程,點擊螢幕右上角的 Dashboard。
建立新的App
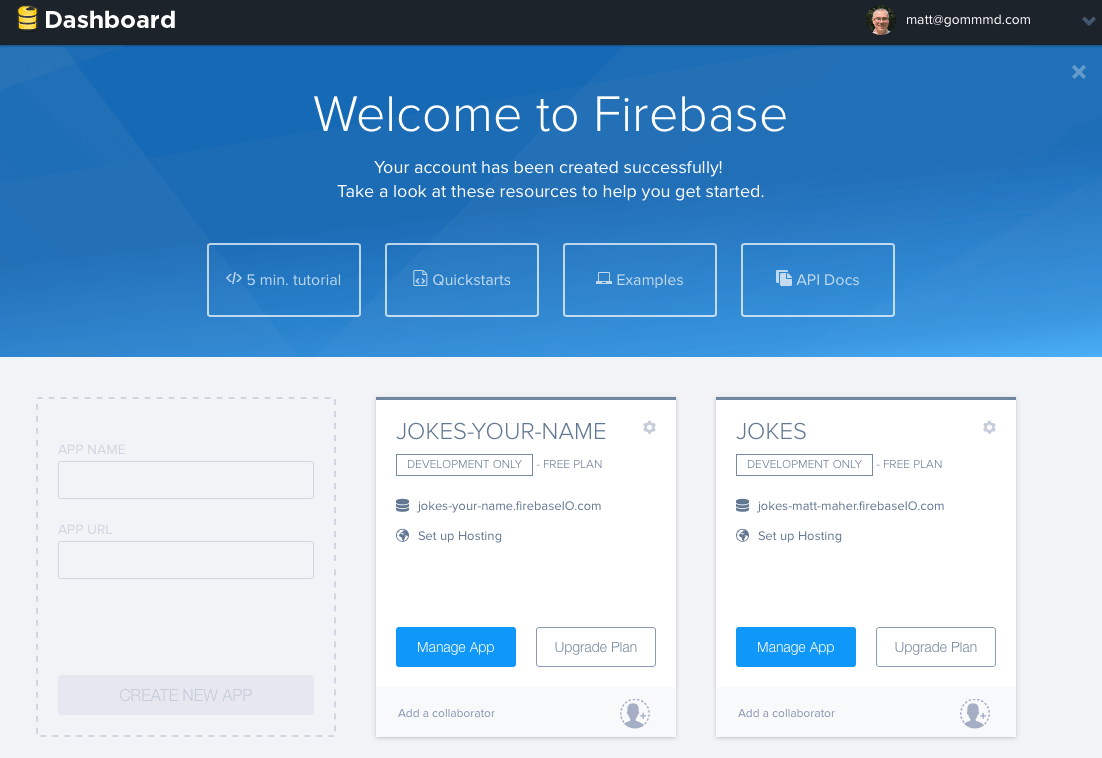
開始正式進入實作部份。在 My First App 的左邊,點擊虛線框,建立新的 App。在 APP NAME 輸入 Jokes。在 APP URL 則輸入 jokes-your-name(your-name 是你自己的名字)。這個欄位必須是獨一無二的,它將會是你的 App 的真實 URL。最後,點擊 CREATE NEW APP 及 Manage App 按鈕。
現在我們可以看到專屬的 Forge 畫面。在這裡,我們能夠看到數據的實時變化,同時 App 中也會做相同的更新。我們可以從 Forge 直接輸入 App 數據。為了從數據層面理解 App 是如何運行的,我們將手動輸入一些數據。
- 在 jokes-your-name 一行,點擊 + 號。
- 在 name 欄位,輸入「jokes」。
- 在新的 jokes 行中,點擊 + 號。
- 在 name 欄位,隨便輸入一個數字。
- 在隨機數這一行,點擊 + 號。
- 在 name 欄位中輸入「jokeText」。
- 在 value 欄位,輸入「What did one computer say to the other? 11001001010101」。
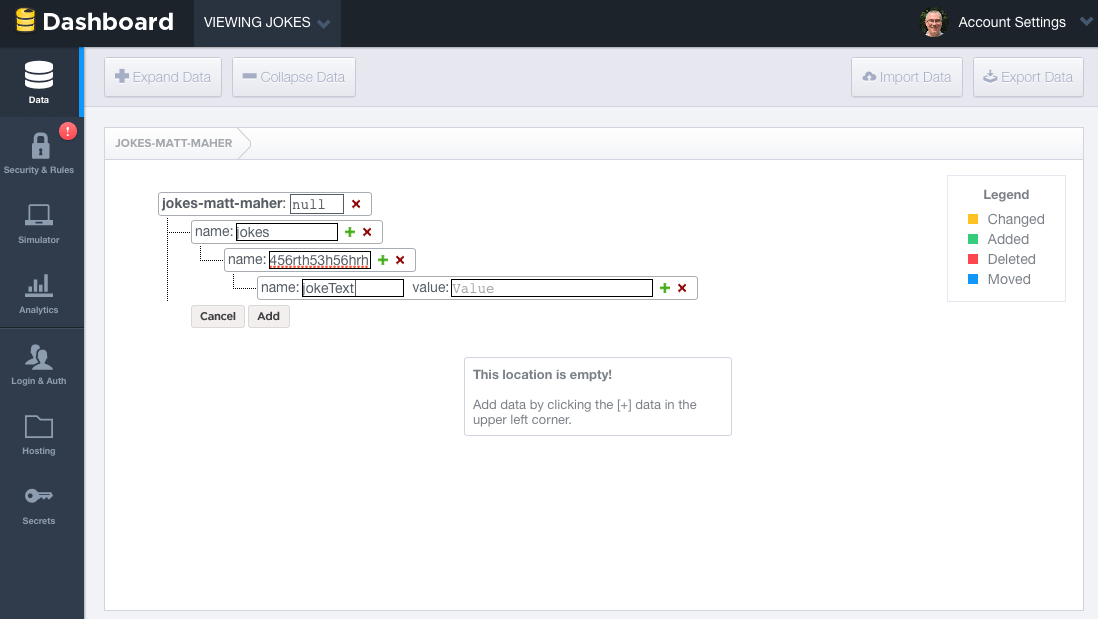
這是一個 joke 的展示例子。接下來我們還會為 jokes 增加更多的東西。另外,我們需要 users,這個過程和 jokes 差不多。在整個製作過程中,我們不時會回到 Forge 看看這些數據,這也是一個良好的習慣。
需要注意的是,所有 Firebase 數據庫中的數據都是以 JSON 格式存儲的。這和 Parse 不同,Firebase 中沒有表或者記錄的概念。當我們在 Firebase 數據庫中存入數據時,實際上是在已存在的 JSON 結構中添加一個 key。例如,剛剛添加的數據看起來像這樣:
{
  "jokes" : {
    "e32e223r44" : {
      "jokeText" : "What did one computer say to the other? 11001001010101"
    }
  }
}
現在你已經對 Firebase 數據庫中的數據有初步了解,繼續下一步。
在進入用戶驗證部分之前,先刪除我們剛剛建立的數據,我們會之後使用程式碼重新建立這些數據。
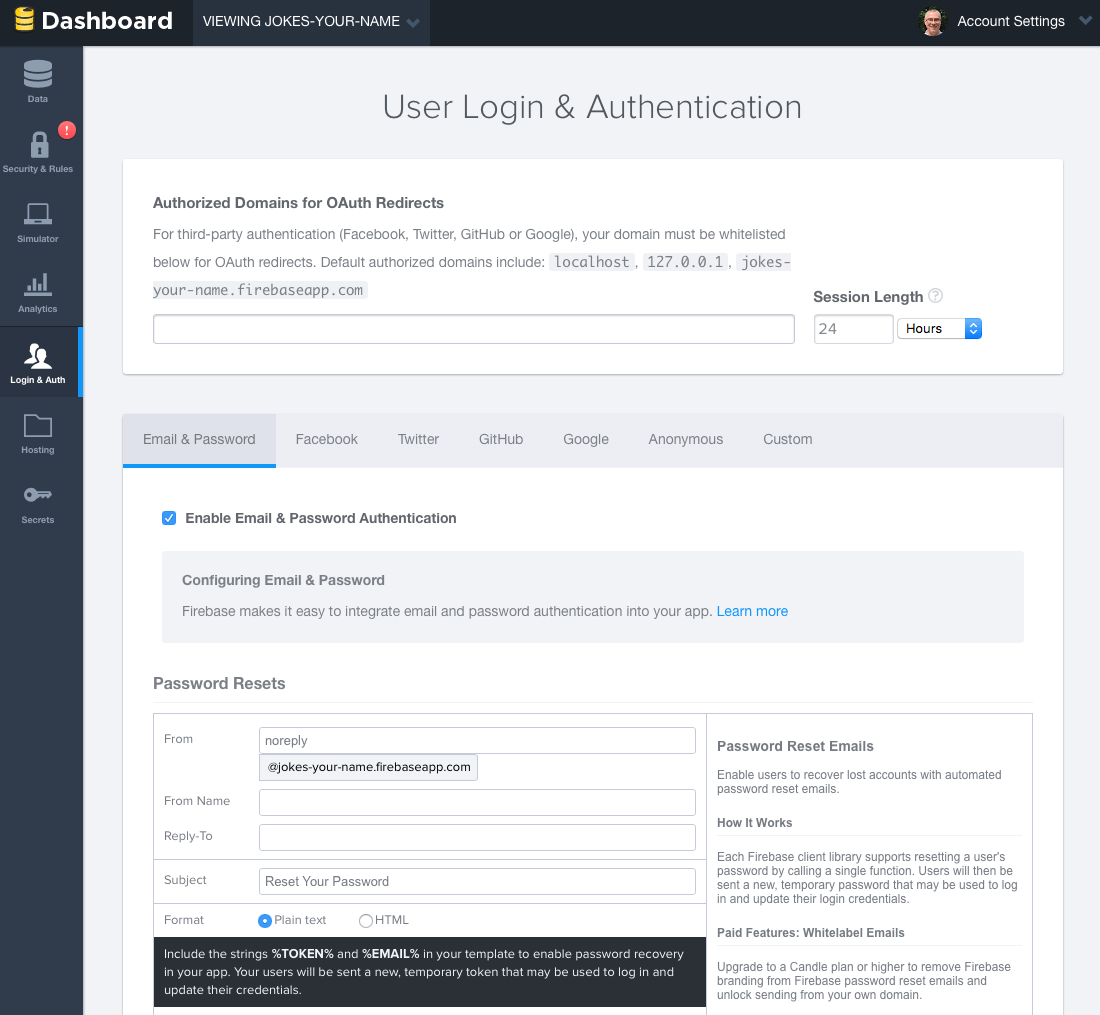
在 FirebaseJokes 中,我們使用郵箱地址和密碼進行用戶驗證。要使用這個功能,在 Forge 左側面板中點擊 Login & Auth。在 Email & Password,勾選 Enable Email & Password Authentication。值著這個機會讓我們仔細地查看一下版面的種種。在剛剛勾選的項目之下,是關於重設密碼的資料。這裡也有一些認證設值得注意的。
安裝 Firebase SDK 和 Base URL 組態
要查看 Firebase App 的 Base URL,需要回到 Forge。Forge 畫面的 URL 就是 App 的 URL,把它複製並貼在 Xcode 中 Constants.swift 的 BASE_URL。
import Foundation

let BASE_URL = "https://jokes-matt-maher.firebaseio.com"
然後,把 Firebase SDK 安裝到 App 中。但在此之前,我們需要安裝 CocoaPods。如果你還沒有安裝 CocoaPods,可以參考這裡的安裝指南:CocoaPods。
完成好 CocoaPods 的安裝程序之後,打開終端機 (terminal)。執行下列指令,使 CocoaPods 在 Xcode 專案中完成初始化:
cdpod init
接著跟著下式程式碼讓 Xcode 打開 Podfile:
open -a Xcode Podfile
繼而修改如下:
platform :ios, '8.0'
use_frameworks!

pod 'Firebase', '>= 2.5.0'
然後,執行下列指令並開始下載 Firebase SDK:
pod install
接下來就使用 Xcode。先確認你是使用 FirebaseJokes.xcworkspace 文檔來啟動程式碼。
使用 Firebase SDK
首先,我們需要在 DataService.swift 中進行一些設置,以便之後的跟進。我們主要是需要一些好的參考。
import Foundation
import Firebase

class DataService {
    static let dataService = DataService()

    private var _BASE_REF = Firebase(url: "\(BASE_URL)")
    private var _USER_REF = Firebase(url: "\(BASE_URL)/users")
    private var _JOKE_REF = Firebase(url: "\(BASE_URL)/jokes")

    var BASE_REF: Firebase {
        return _BASE_REF
    }

    var USER_REF: Firebase {
        return _USER_REF
    }

    var CURRENT_USER_REF: Firebase {
        let userID = NSUserDefaults.standardUserDefaults().valueForKey("uid") as! String

        let currentUser = Firebase(url: "\(BASE_REF)").childByAppendingPath("users").childByAppendingPath(userID)

        return currentUser!
    }

    var JOKE_REF: Firebase {
        return _JOKE_REF
    }
}
要使用 Firebase,我們需要滙入 Firebase 框架。 DataService 類別是一個專門和 Firebase 打交道的服務類別。要讀寫數據,需要利用 Firebase URL 建立 Firebase 參考數據庫。Base URL 也就是 App 數據庫的 URL。稍後我們會把 users 和 jokes 以子節點的形式保存。要訪問子節點,只需要將節點名(比如 users)添加到 Base URL 後面即可。為方便訪問,我們也建立了這兩個子節點的參考。
建立新的使用賬號
從 CreateAccountViewController.swift 開始。因為要用到 Firebase,所以一開始我們就要把它滙入。
import UIKit
import Firebase

class CreateAccountViewController: UIViewController {
在 createAccount(),我們將會從欄位收集正文 (text) 和嘗試使用這些去建立一個新的用戶。這將發生 Firebase 的 createUser() 方法。把這個方法的程式碼依下列作出修改:
@IBAction func createAccount(sender: AnyObject) {
    let username = usernameField.text
    let email = emailField.text
    let password = passwordField.text

    if username != "" && email != "" && password != "" {

        // Set Email and Password for the New User.

        DataService.dataService.BASE_REF.createUser(email, password: password, withValueCompletionBlock: { error, result in

            if error != nil {

                // There was a problem.
                self.signupErrorAlert("Oops!", message: "Having some trouble creating your account. Try again.")

            } else {

                // Create and Login the New User with authUser
                DataService.dataService.BASE_REF.authUser(email, password: password, withCompletionBlock: {
                    err, authData in

                    let user = ["provider": authData.provider!, "email": email!, "username": username!]

                    // Seal the deal in DataService.swift.
                    DataService.dataService.createNewAccount(authData.uid, user: user)
                })

                // Store the uid for future access - handy!
                NSUserDefaults.standardUserDefaults().setValue(result ["uid"], forKey: "uid")

                // Enter the app.
                self.performSegueWithIdentifier("NewUserLoggedIn", sender: nil)
            }
        })

    } else {
        signupErrorAlert("Oops!", message: "Don't forget to enter your email, password, and a username.")
    }

}
假設用戶輸入的內容沒有問題,成功建立一個新用戶並進行登錄。如果缺少了某些必要信息,就會顯示警告提示。然後,在類別中加入以下方法:
func signupErrorAlert(title: String, message: String) {

        // Called upon signup error to let the user know signup didn't work.

        let alert = UIAlertController(title: title, message: message, preferredStyle: UIAlertControllerStyle.Alert)
        let action = UIAlertAction(title: "Ok", style: .Default, handler: nil)
        alert.addAction(action)
        presentViewController(alert, animated: true, completion: nil)
    }
把數據保存在 DataService.swift 的 createNewAccount() 中:
func createNewAccount(uid: String, user: Dictionary) {

        // A User is born.

        USER_REF.childByAppendingPath(uid).setValue(user)
    }
要使數據存儲到 Firebase 數據庫,只需要呼叫 setValue 方法。在上述的程式碼中,我們將 user 物件儲存到 users 參考數據庫下的子節點(例如 /users/1283834/),子節點的 key 就是 uid。
除了將用戶儲存到 Firebase 數據庫,我們還會儲存用戶的 uid 到 NSUserDefaults。這是方便我們追蹤現有用戶。
用戶登錄
首先,import Firebase 到 LoginViewController.swift。這裡,我們將判斷一個用戶是否已經登錄,如果未登錄將讓這個用戶登錄。
在 viewDidAppear() ,我們要檢查一下儲存的 uid 是否為 nil ,以及用戶是否擁有賬號。如果這些都通過,就可以跳過登錄界面,相反,則會要求進行登錄。
override func viewDidAppear(animated: Bool) {
        super.viewDidAppear(animated)

        // If we have the uid stored, the user is already logger in - no need to sign in again!

        if NSUserDefaults.standardUserDefaults().valueForKey("uid") != nil && DataService.dataService.CURRENT_USER_REF.authData != nil {
            self.performSegueWithIdentifier("CurrentlyLoggedIn", sender: nil)
        }
    }
tryLogin() 是一個操作方法,當用戶點擊登錄按鈕而被呼叫。跟著下列程式碼進行修改,並加入輔助方法 loginErrorAlert:
@IBAction func tryLogin(sender: AnyObject) {

        let email = emailField.text
        let password = passwordField.text

        if email != "" && password != "" {

            // Login with the Firebase's authUser method

            DataService.dataService.BASE_REF.authUser(email, password: password, withCompletionBlock: { error, authData in

                if error != nil {
                    print(error)
                    self.loginErrorAlert("Oops!", message: "Check your username and password.")
                } else {

                    // Be sure the correct uid is stored.

                    NSUserDefaults.standardUserDefaults().setValue(authData.uid, forKey: "uid")

                    // Enter the app!

                    self.performSegueWithIdentifier("CurrentlyLoggedIn", sender: nil)
                }
            })

        } else {

            // There was a problem

            loginErrorAlert("Oops!", message: "Don't forget to enter your email and password.")
        }
    }

    func loginErrorAlert(title: String, message: String) {

        // Called upon login error to let the user know login didn't work.

        let alert = UIAlertController(title: title, message: message, preferredStyle: UIAlertControllerStyle.Alert)
        let action = UIAlertAction(title: "Ok", style: .Default, handler: nil)
        alert.addAction(action)
        presentViewController(alert, animated: true, completion: nil)
    }
Firebase 內建支援用戶郵箱地址及密碼驗證的功能。tryLogin() 方法使用了 Firebase 的 authUser() 方法去驗證郵箱地址和密碼是否與用戶賬號相符。若果結果相符,uid 將會被儲存並導航至 App。相反的話,則會出示警告並讓用戶重新輸入資料再次嘗試登陸。
現在,App 的用戶註冊和登錄功能都已經完成了。
Joke 模型
什麼是一個笑話?稍後我們再來闡釋這個哲學問題,現在我們要說的是 FirebaseJokes App 中的一個笑話。我們需要制定出 Joke 模型。
打開 Joke.swift並滙入 Firebase。在數據庫中,一個笑話代表一個奇特的 ID 號。這個自動產生的數字包貪了以下的 joke 屬性:
- jokeText
- jokeVotes
- username (笑話的作者)
我們可以用 init() 初始化一個新的笑話,它需要一個成功通過 joke 的 ID(或 key)和內容(使用字典格式)。
class Joke {
    private var _jokeRef: Firebase!

    private var _jokeKey: String!
    private var _jokeText: String!
    private var _jokeVotes: Int!
    private var _username: String!

    var jokeKey: String {
        return _jokeKey
    }

    var jokeText: String {
        return _jokeText
    }

    var jokeVotes: Int {
        return _jokeVotes
    }

    var username: String {
        return _username
    }

    // Initialize the new Joke

    init(key: String, dictionary: Dictionary) {
        self._jokeKey = key

        // Within the Joke, or Key, the following properties are children

        if let votes = dictionary["votes"] as? Int {
            self._jokeVotes = votes
        }

        if let joke = dictionary["jokeText"] as? String {
            self._jokeText = joke
        }

        if let user = dictionary["author"] as? String {
            self._username = user
        } else {
            self._username = ""
        }

        // The above properties are assigned to their key.

        self._jokeRef = DataService.dataService.JOKE_REF.childByAppendingPath(self._jokeKey)
    }
}
新增笑話
這時我們需要在 AddJokeViewController.swift 滙入 Firebase。用戶可以在這裡輸入笑話,然後它會立即隨著更新而在所有裝置上顯示出來。
由 viewDidLoad() 開始,我們會取得現行用戶的用戶名,並以此作為建立新笑話的作者。
override func viewDidLoad() {
        super.viewDidLoad()

        // Get username of the current user, and set it to currentUsername, so we can add it to the Joke.

        DataService.dataService.CURRENT_USER_REF.observeEventType(FEventType.Value, withBlock: { snapshot in

            let currentUser = snapshot.value.objectForKey("username") as! String

            print("Username: \(currentUser)")
            self.currentUsername = currentUser
            }, withCancelBlock: { error in
                print(error.description)
        })
    }
當 saveJoke() 被呼叫,jokeField會使用正文建立一個 newJoke 字典,以 0 作為現行笑話所獲得的點讚數目,並把現行用戶作為笑話的作者。將這些值被分配到對應的 ids,然後經 DataService 的 createNewJoke() 進行儲存。
在 AddJokeViewController 類別宣告以下類變數:
var currentUsername = ""
修改 saveJoke 方法為:
@IBAction func saveJoke(sender: AnyObject) {

        let jokeText = jokeField.text

        if jokeText != "" {

            // Build the new Joke.
            // AnyObject is needed because of the votes of type Int.

            let newJoke: Dictionary = [
                "jokeText": jokeText!,
                "votes": 0,
                "author": currentUsername
            ]

            // Send it over to DataService to seal the deal.

            DataService.dataService.createNewJoke(newJoke)

            if let navController = self.navigationController {
                navController.popViewControllerAnimated(true)
            }
        }
    }
使用字典物件暫時存放笑話數據。實際笑話是儲存在 DataService 的 creatNewJoke 方法。在 DataService.swift 新增一個 createNewJoke 方法:
func createNewJoke(joke: Dictionary) {

        // Save the Joke
        // JOKE_REF is the parent of the new Joke: "jokes".
        // childByAutoId() saves the joke and gives it its own ID.

        let firebaseNewJoke = JOKE_REF.childByAutoId()

        // setValue() saves to Firebase.

        firebaseNewJoke.setValue(joke)
    }
再一次,使用 Firebase 的 setValue() 方法來儲存笑話。要注意的是,我们使用了 Joke 參考數據庫並呼叫了 childByAutoId 方法。當觸發 childByAutoId 時,Firebase 會產生一個時間戳記,也是每一個笑話獨特的 ID。這是確保了每一個笑話都擁有及連結上一個獨特的 ID。
現行用戶登出
通常,這個功能會被放置在「設定」或「個人檔案」中,但這次我們則在 AddJokeViewController.swift 允許用戶登出。有別平常做法,這是開玩笑的嗎?
logout() 使用 Firebase 的 unauth() 為用戶登出。雖然,除了用戶登出,還需要去除儲存下來的用戶 uid 並送回 LoginViewController。
變更 logout 方法如下:
@IBAction func logout(sender: AnyObject) {

        // unauth() is the logout method for the current user.

        DataService.dataService.CURRENT_USER_REF.unauth()

        // Remove the user's uid from storage.

        NSUserDefaults.standardUserDefaults().setValue(nil, forKey: "uid")

        // Head back to Login!

        let loginViewController = self.storyboard!.instantiateViewControllerWithIdentifier("Login")
        UIApplication.sharedApplication().keyWindow?.rootViewController = loginViewController
    }
如果忘記將用戶的 uid 刪除的話,這樣會導致新用戶在登錄時出現問題,因此我們需要避免這種問題的發生。
顯示全部笑話
終於來到 Firebase 抓取數據的階段。我們將在 JokesFeedTableViewController.swift 透過 UITableView 列出全部笑話。毫無疑問,這裡也要滙入 Firebase。
首先在 viewDidLoad() 使用 observeEventType() 方法。Firebase 數據經非同步收聽器在參考數據中被檢索出來。這個方法不僅在呼叫 JokesFeedTableViewController.swift 的 viewDidLoad(),還會每當數據庫的笑話有所變動而被呼叫。
    var jokes = [Joke]()

    override func viewDidLoad() {
        super.viewDidLoad()

        // observeEventType is called whenever anything changes in the Firebase - new Jokes or Votes.
        // It's also called here in viewDidLoad().
        // It's always listening.

        DataService.dataService.JOKE_REF.observeEventType(.Value, withBlock: { snapshot in

            // The snapshot is a current look at our jokes data.

            print(snapshot.value)

            self.jokes = []

            if let snapshots = snapshot.children.allObjects as? [FDataSnapshot] {

                for snap in snapshots {

                    // Make our jokes array for the tableView.

                    if let postDictionary = snap.value as? Dictionary {
                        let key = snap.key
                        let joke = Joke(key: key, dictionary: postDictionary)

                        // Items are returned chronologically, but it's more fun with the newest jokes first.

                        self.jokes.insert(joke, atIndex: 0)
                    }
                }

            }

            // Be sure that the tableView updates when there is new data.

            self.tableView.reloadData()
        })
    }
方法中包含了快照(snapshot)。透過使用快照,我們可以建立一個 Joke 陣列,這將會填充到 TabelView。在 Firebase 的 Jokes,我們會把最新的笑話置頂。由於 Firebase 是按照時間順序(建立時間)而作出排列,故事我們需要倒序建立陣列。
一旦有了一連串最新笑話的陣列,通過刷新 TableView 讓每個用戶都能看到。
剩下的工作還有處理 tableView:cellForRowAtIndexPath: 和 JokeCellTableViewCell.swift。 在 tableView:cellForRowAtIndexPath:,我們透過 JokeCellTableViewCell.swift 的 configureCell() 發送獨立笑話。
override func numberOfSectionsInTableView(tableView: UITableView) -> Int {

        return 1
    }

override func tableView(tableView: UITableView, numberOfRowsInSection section: Int) -> Int {

        return jokes.count
    }


override func tableView(tableView: UITableView, cellForRowAtIndexPath indexPath: NSIndexPath) -> UITableViewCell {

        let joke = jokes[indexPath.row]

        // We are using a custom cell.

        if let cell = tableView.dequeueReusableCellWithIdentifier("JokeCellTableViewCell") as? JokeCellTableViewCell {

            // Send the single joke to configureCell() in JokeCellTableViewCell.

            cell.configureCell(joke)

            return cell

        } else {

            return JokeCellTableViewCell()

        }
    }
JokeCellTableViewCell.swift 中的 configureCell(),在這裡我們會為設定 labels 及收聽「點讚」按鈕。
func configureCell(joke: Joke) {
        self.joke = joke

        // Set the labels and textView.

        self.jokeText.text = joke.jokeText
        self.totalVotesLabel.text = "Total Votes: \(joke.jokeVotes)"
        self.usernameLabel.text = joke.username

        // Set "votes" as a child of the current user in Firebase and save the joke's key in votes as a boolean.

        voteRef = DataService.dataService.CURRENT_USER_REF.childByAppendingPath("votes").childByAppendingPath(joke.jokeKey)

        // observeSingleEventOfType() listens for the thumb to be tapped, by any user, on any device.

        voteRef.observeSingleEventOfType(.Value, withBlock: { snapshot in

            // Set the thumb image.

            if let thumbsUpDown = snapshot.value as? NSNull {

                // Current user hasn't voted for the joke... yet.

                print(thumbsUpDown)
                self.thumbVoteImage.image = UIImage(named: "thumb-down")
            } else {

                // Current user voted for the joke!

                self.thumbVoteImage.image = UIImage(named: "thumb-up")
            }
        })
    }
利用程式碼在 awakeFromNib() 建立 UITapGestureRecognizer。我們還需要一個 Joke 和 Firebase 參考。
var joke: Joke!
var voteRef: Firebase!

override func awakeFromNib() {
    super.awakeFromNib()

    // UITapGestureRecognizer is set programatically.

    let tap = UITapGestureRecognizer(target: self, action: "voteTapped:")
    tap.numberOfTapsRequired = 1
    thumbVoteImage.addGestureRecognizer(tap)
    thumbVoteImage.userInteractionEnabled = true
}
在 voteTapped(),另一個收聽器在等候被點擊。在這個方法中,「點讚」被儲存在現行用戶的「vote」時會連帶一個 key,當而這個 key 符合笑話的 key ID ,那麼得出來的值便是 true。這是透過在 configureCell() 建立的 voteRef 路徑來傳送。
func voteTapped(sender: UITapGestureRecognizer) {

        // observeSingleEventOfType listens for a tap by the current user.

        voteRef.observeSingleEventOfType(.Value, withBlock: { snapshot in

            if let thumbsUpDown = snapshot.value as? NSNull {
                print(thumbsUpDown)
                self.thumbVoteImage.image = UIImage(named: "thumb-down")

                // addSubtractVote(), in Joke.swift, handles the vote.

                self.joke.addSubtractVote(true)

                // setValue saves the vote as true for the current user.
                // voteRef is a reference to the user's "votes" path.

                self.voteRef.setValue(true)
            } else {
                self.thumbVoteImage.image = UIImage(named: "thumb-up")
                self.joke.addSubtractVote(false)
                self.voteRef.removeValue()
            }

        })
    }
在 Joke.swift 中,voteTapped() 依靠點擊為 addSubtractVote() 的布林值。如果值為 true,則表明用戶對這個笑話點讚,而 false 則表示用戶沒有點讚。
// Add or Subtract a Vote from the Joke.

    func addSubtractVote(addVote: Bool) {

        if addVote {
            _jokeVotes = _jokeVotes + 1
        } else {
            _jokeVotes = _jokeVotes - 1
        }

        // Save the new vote total.

        _jokeRef.childByAppendingPath("votes").setValue(_jokeVotes)

    }
在 Joke.swift 的 addSubtractVote(),使用布林值為笑話增加或減去「點讚」。然後,使用 Firebase 的 setValue() 方法為笑話點讚數更新到數據庫中。
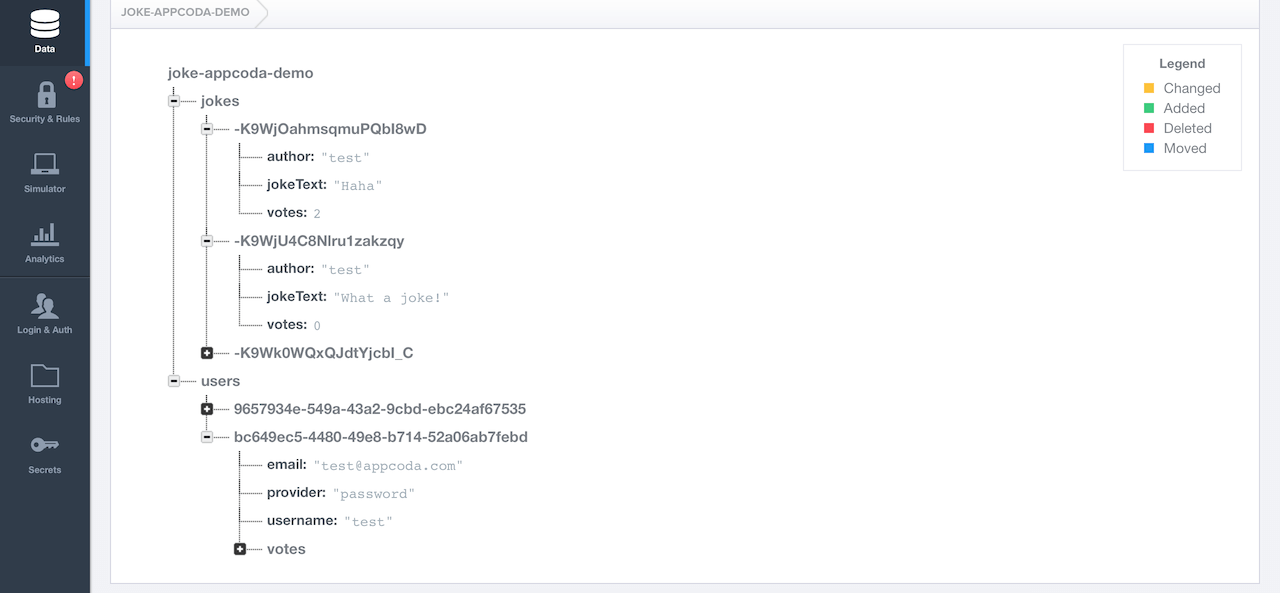
測試 App
現在你可以準備為這個 App 進行測試。新建一個用戶,並發表幾則笑話。你可以對這些笑話進行點讚。然後在 Firebase 的 dashboard 中,你可以看到剛建立的用戶及笑話。
結語
我們成功了!雖然這個 App 比較簡單,但相信用戶會喜歡它的互動性。我們也因此獲得了難得的 Firebase 使用經驗。
可以在此處下載完整程式碼。
對 iOS 開發者來說,使用 Firebase 有很大的發揮空間。透過 FirebaseJokes 作為起步的開始。
嘗試一下關於用戶驗證的其他選項,為 FirebaseJokes 增加新的功能,比如實時聊天功能,自由地發揮無窮的可能性。
這裡進一步建議有關圖片的問題:Firebase 有一定的存儲限制,因此圖片還是存放在別的地方比較好。對於文字類的 App(如這個範例),存儲基本上不是問題,但對於較大文件,最好是採用另外的服務。
希望 Firebase 能夠有一天應用在你的 App 專案之中。
如果你對單完測試或本教程有任何疑問或困難,歡迎留言查詢。
原文:Introduction to Firebase: Building a Simple Social App in Swift